This guide will take you through how to use Leonardo’s AI Canvas Tool
Introducing the Leonardo.Ai Canvas Editor
The Leonardo.Ai Canvas Editor is a robust tool that allows you to create, edit, and enhance your images using advanced AI technology. With this editor, you can easily make detailed adjustments, remove unwanted elements, and even generate new content using inpainting and outpainting techniques.
In the Canvas Editor, you’ll have access to a variety of powerful features and tools that help you achieve the results you desire. The possibilities are truly endless!
Let’s take a closer look at some of the features and tools available on the canvas:
Uploading an Image
To begin using the Canvas Editor, you first need to upload an image. Simply click on the ‘Upload Image’ button. After selecting and uploading your image, it will appear on the canvas, ready for editing.

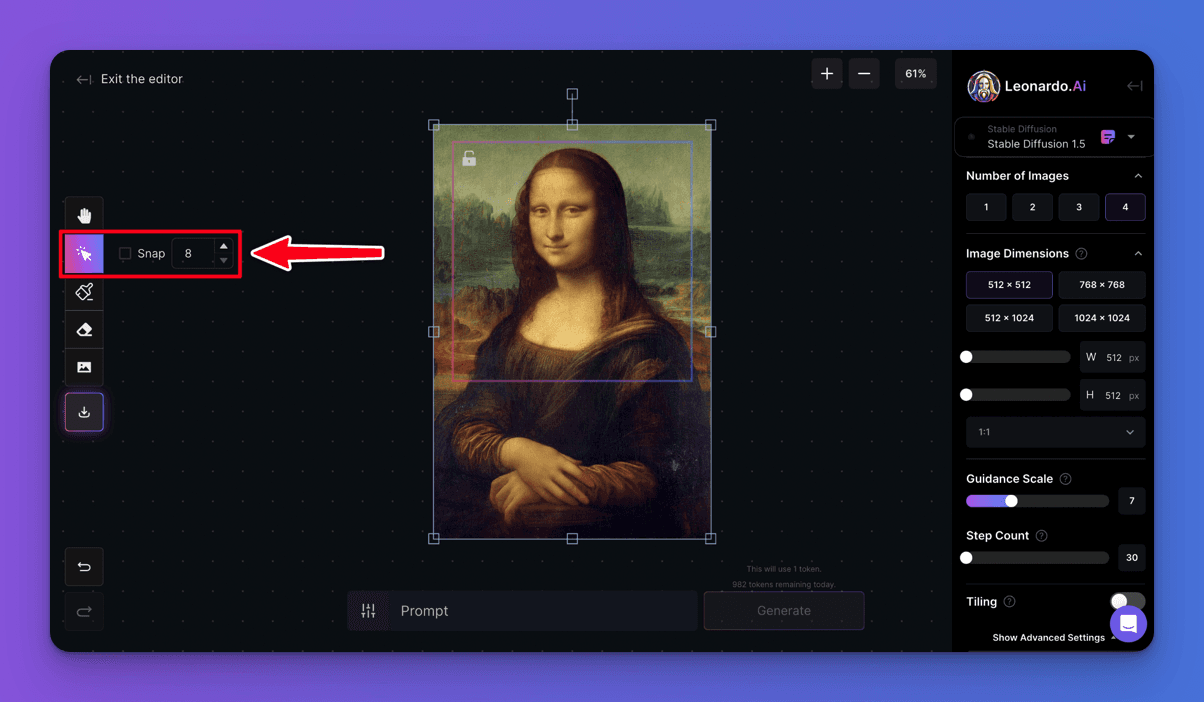
Selecting & Moving Elements
After uploading your image, you can select and move elements around on the canvas, including the generation frame and any new images you create. To do this, click on the ‘Select’ button, then click on the element you want to move. You can drag and drop it to the desired location.
💡 Tip: Place the generation frame over the area you want to edit, ensuring it overlaps with the existing image. This ensures a smooth transition when the new frame is applied.

Panning & Moving Around The Canvas
The ‘Pan’ tool allows you to move around the canvas and explore different parts of the image. To use it, click on the ‘Pan’ button. Once activated, click and drag on the canvas to shift the view and navigate to different areas of the image.
Zooming
To zoom in and out of the canvas, use the ‘Zoom’ buttons. Click the ‘+’ button to zoom in and the ‘-‘ button to zoom out. Alternatively, you can scroll using your mouse or trackpad to adjust the zoom level.

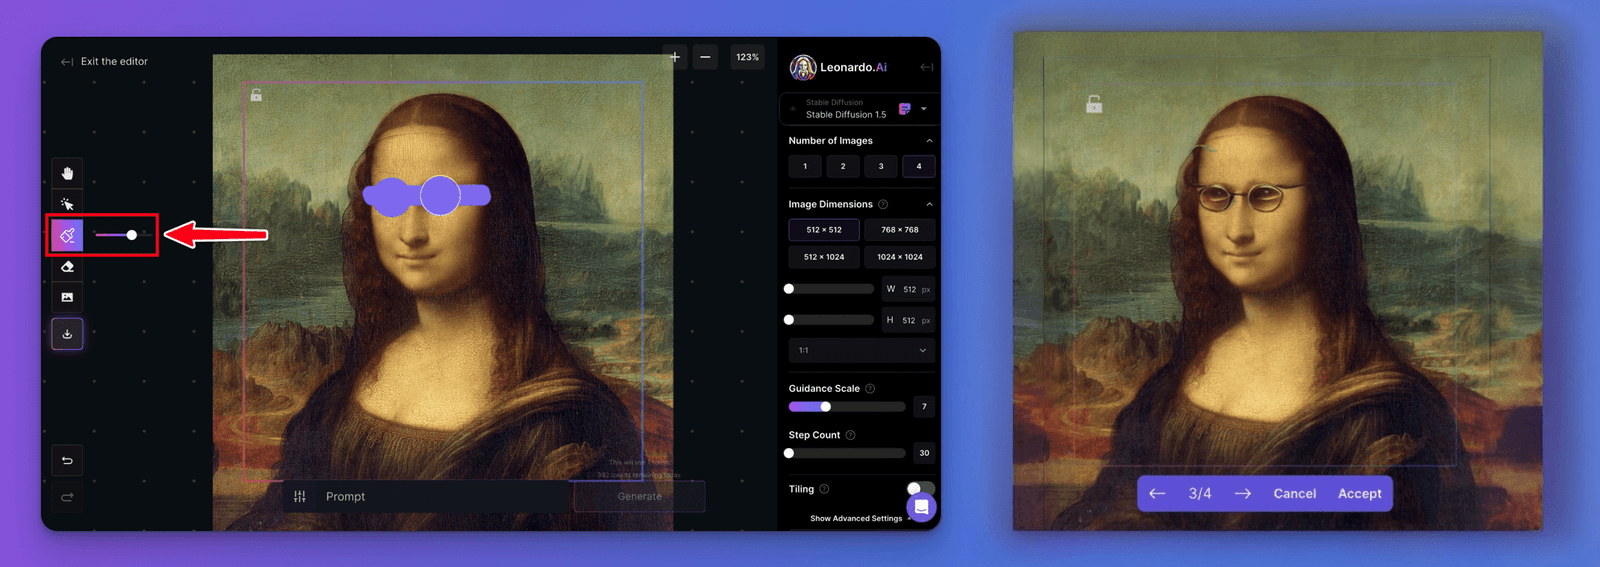
Drawing a Mask
To make precise adjustments to specific areas of an image, use the ‘Draw Mask’ button on the toolbar. This allows you to paint a mask over the area you want to modify. After masking, you can enter a prompt like “person wearing sunglasses” to regenerate that section of the image. This feature enables targeted changes while preserving elements like color, subject, and style from the original image.
Erasing
The ‘Erase’ button on the toolbar allows you to remove unwanted parts of an image. Once an area is erased, you can enter a prompt for the image and regenerate that section. This feature is particularly useful when you need to eliminate elements from your image. It can also serve as an alternative to the mask when the changes you’re making are too influenced by the original image beneath.

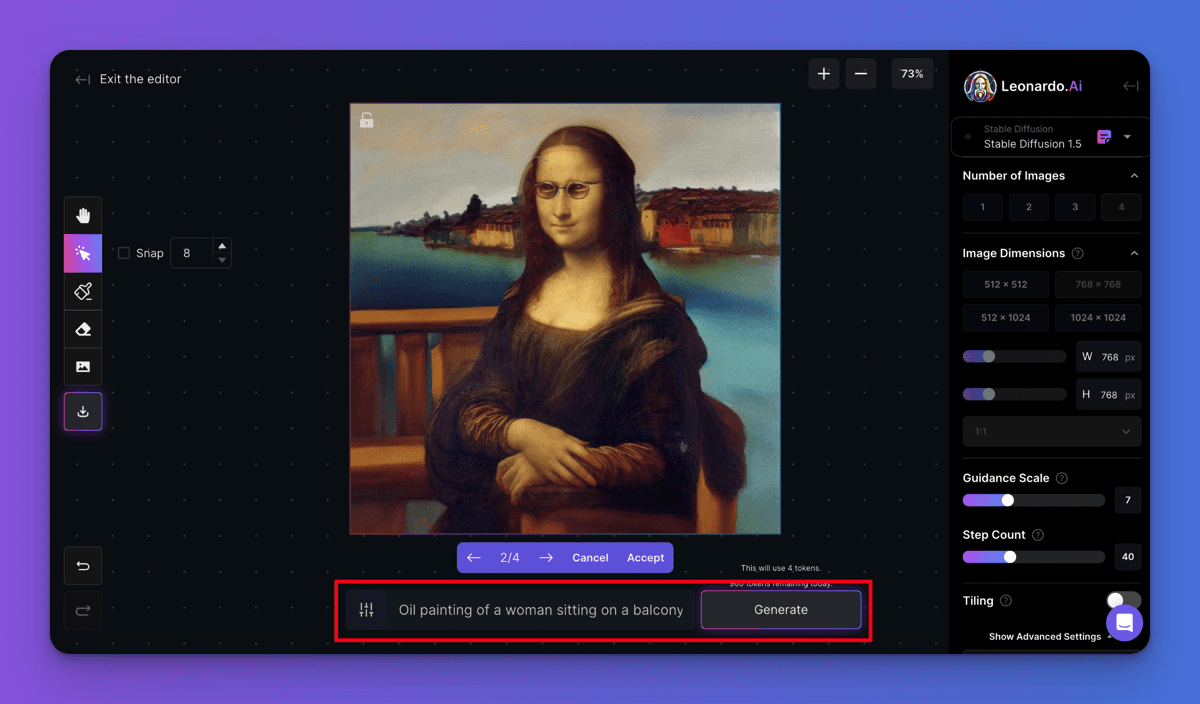
Prompting & Generating
To generate new content, enter a detailed prompt in the ‘Prompt’ text field and click the ‘Generate’ button. Here are some tips for crafting a good prompt:
- Be specific with your description.
- Use complete sentences to clearly express your vision.
- Describe all the elements you want to appear in the generated frame.
Additionally, you can use the ‘Negative Prompt’ button to specify what you don’t want the AI to generate, helping to refine the output to your exact needs.
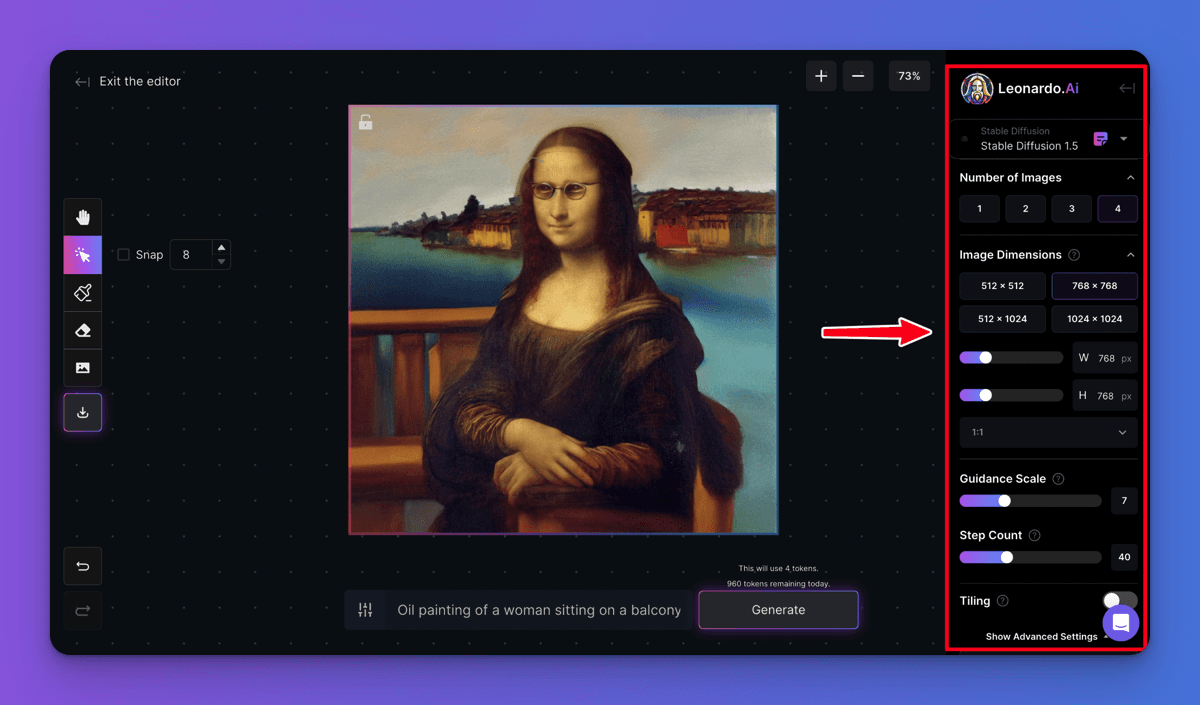
Controlling Parameters
The ‘Control Panel’ on the right-hand side of the canvas allows you to fine-tune various settings and parameters for the image generation. Here’s what you can adjust:
- Model: Select the AI model to use for the generation.
- Number of Images: Choose how many images you want to generate.
- Image Dimensions: Adjust the size of the generated image.
- Guidance Scale: Control the level of adherence to your prompt.
- Step Count: Set how many steps the AI should take to refine the image.
- Tiling Option: Toggle this option to create repeating patterns for larger images.
Each of these settings impacts the final result, and you can find more details in our FAQ and Guides page.
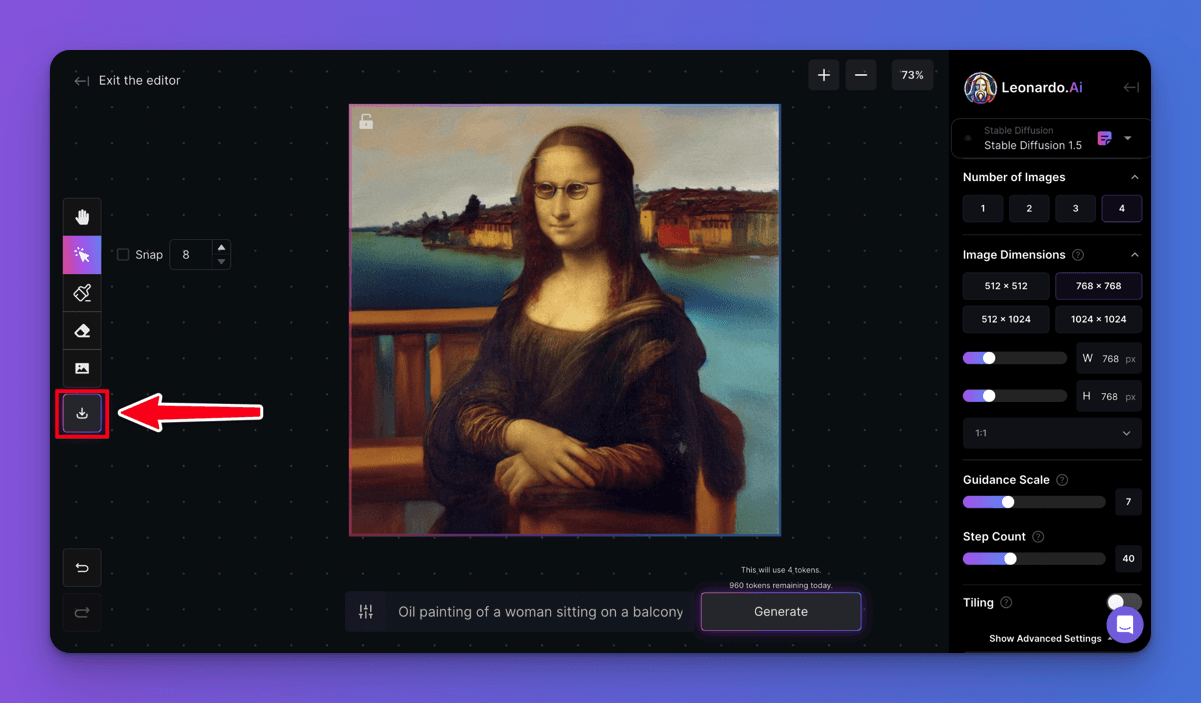
Saving & Downloading Artwork
After you’ve generated an image you’re satisfied with, simply click on the ‘Download Artwork’ button on the toolbar to save the image to your computer. This will allow you to keep your creation for further use or sharing.
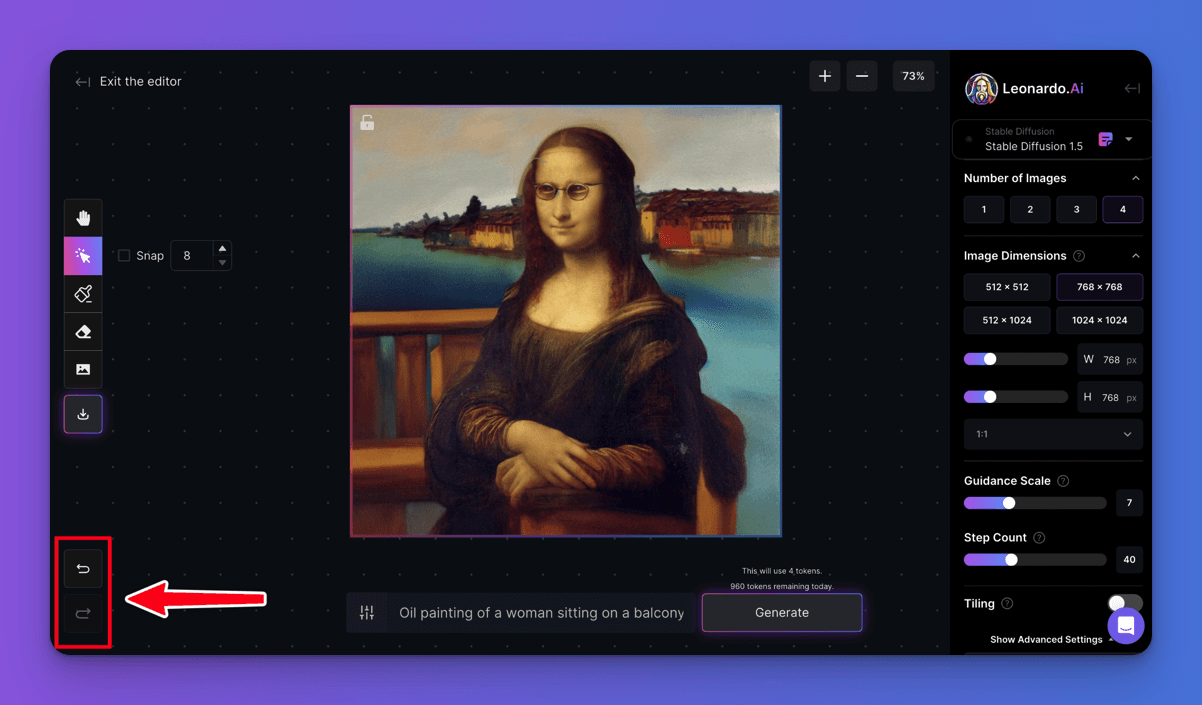
Undo & Redo
If you make a mistake or wish to revert an action, simply use the ‘Undo’ button on the bottom-left of the canvas. If you want to restore the action, click the ‘Redo’ button. These buttons help you easily navigate through changes and adjustments to your image.
We hope this guide has been helpful and provided you with a clear understanding of how to use the Leonardo.AI Canvas Editor. For additional tips and resources, explore our other guides. If you have any questions, feel free to reach out to us via Intercom or Discord. We’re excited to see what you’ll create using the canvas editor!


Leave a Reply